Wednesday, January 4, 2017

How to Create a Ribbed Cuff on the Prym Loom


If you own a Prym sock loom, you probably consider it to be one of the most enjoyable looms you've ever used. It's light, compact, and its sturdy frame sits neatly in your hand while you knit.

But one thing that you cannot do is purl. Because the pegs are shaped like slightly bent paper clips, stitches slip off if you try to purl. Purling on the loom involves pulling the loop of the peg and replacing it. Generally, the loops  on neighboring pegs will slip off too. The manual, videos, and patterns provided by Prym show various methods of making the cuff but none involve a purl stitch.  They know it's impossible.

Or is it?

Here is a sock with a ribbed cuff that I made on the Prym large loom (36 pegs).


Or, as I like to call it : Prym Rib (I know that's a terrible joke).

The way to create the ribbing begins with rows of regular stockinette. Cast on your foundation row. Start by wrapping each peg. When you are knitting this row, use the flat stitch, that is, lay the yarn flat in front of the peg. This keeps the edge of the ribbing tighter. Now you can e-wrap and knit the next 11 rows.

Now we begin making our ribbing. I recommend using a couple of elastic brands over the stitches you aren't working on. This keeps any stitches from skipping but it also helps to isolate the stitches you are purling.

For this sock I used a k2 p2 ribbing. But with the 36 peg loom, you could use k1 p1 rib out or even a k2 p1.

Cover all stitches except the first p2 with an elastic. I use one on each side of the loom. Pull one of the loops off the peg with the loom tool, then pull out the stitch on each row right down to the foundation row. It will look like a ladder. 


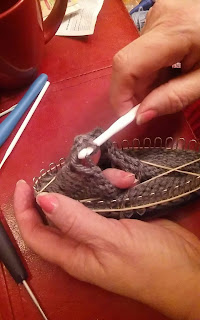
Now we will re-stitch all those rows with a crochet hook.  Starting above the first “rung” on your ladder, insert the crochet hook from the top and turn it so that the yarn loops around it and the hook part is now facing up.

Now, simply pull the second “rung” through that loop.  Then the third, hook it and pull it through the loop, always working from the back of your knitting - that is, inside the loom.  Continue until you have pulled all the rungs of your ladder through with the hook.  From the back, it will look like knitted stitches, but from the front of your work, it will be purled.


Repeat for the second purl stitch.  Then, move your elastic over.  Cover the p2 you just did, plus the next two stitches which are to remain K2.  Leave only the next set of p2 uncovered. Repeat the process with the unraveling and the purling with the crochet hook.  Repeat your k2 p2 pattern all around until you reach your first k2.  
And there!  Your ribbed cuff is done!  If you want it to be a thick cuff, then simply knit more rounds initially and turn it up, as you normally would a rolled cuff on the Prym or other round loom.  Make your cuff as short or long as you like.

Holiday Boot Sock/Slipper Sock

The sock in the photo is 12 rows of ribbed cuff, 12 rows of Red Heart Grey Heather, 4 rows Red Heart soft white, 1 row Red Heart Cherry Red, 4 rows soft white and then 12 rows of grey heather again.  The heel is worked in a dark green (don’t know the name, it is scrap yarn).  Then body of the foot is worked in grey and for the toe, I simply make another heel, bind off and sew to the body to close the toe box.  I put the seam on the top which means that the toe is worked on the same  pegs as the heel, making it all very simple.

Friday, June 17, 2016

Baby Sweater Loom Pattern - Easy - No Shaping


This is the easiest baby sweater pattern you will ever find for the loom.  This sweater was made on the KB All in One loom, which has a gauge of ⅜”.  The pattern assumes that you will be using #4 weight  yarn and e-wrap with a gauge of 4 stitches per inch.  There are no fancy stitches, just knit and purl, no shaping and straightforward seaming.

The sweater is made in 5 pieces - the back panel, two front panels and two sleeves.  The pattern is sized for newborn, but it’s easy to adjust for an older baby or toddler using a sizing chart and dividing the measurements by your stitch gauge.  Every panel and both sleeves will be edged in a garter stitch for 4 rows.

BACK PANEL


Cast on 32 pegs
K 1 row
P 1 row
K 1 row
P 1 row
Knit every row thereafter until piece measures 10 inches in length

FRONT PANELS (MAKE 2)


Cast on 16 pegs
K 1 row
P 1 row
K 1 row
P 1 row
Knit every row until piece measures 10 inches in length

SLEEVES (MAKE 2)

Cast on 26 pegs
K 1 row
P 1 row
K 1 row
P1 row
Knit every row until piece measures 6 inches in length

ASSEMBLE:


The front panels will be seamed to the back panel at the shoulder.  However, only half the width of each panel will be seamed, with the other half being turned down for lapels.  I find it is easiest to set the back and front panels on a table with the WS facing up, and seam from the middle of each front panel to the armhole edge.  You can either fold the front panels in half or simply count 8 stitches from center of the front panel to shoulder edge in order to make them even.
Seam the sleeves to the body of the sweater by placing them, WS facing up, with the center of the sleeve at the shoulder seam.  

Seam the sides of the sweater from bottom up and down the sleeves to the wrist edge.

You may need to block the panels before seaming if they are curling at the edges too much.  It will make setting the panels evenly much easier, but it’s not essential.  Finish the edges of the front panels and collar area with a row of single or half double crochet. You can crochet a chain to use as a tie, or add a ribbon.  Crochet a flower to attach to the collar lapels or embellish any way you like.  It’s a basic pattern that you can make your own by using multiple colors, striping, or adding unique finishing touches.

Tuesday, June 14, 2016

Review of the KB Sock Loom EFG

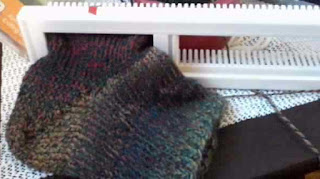
I recently purchased the EFG Sock Loom from Authentic Knitting Board.  This loom is specifically made to use sock yarn and is fully adjustable from baby socks through adult sized socks. 


Although I love my thick slipper socks and medium weight socks that I loom on other round and rectangular looms, I really wanted to try my hand at some lighter socks made from sock yarn.  So I started with two sock yarn weights.  I purchased one skein of #1 weight Red Heart - Heart and Sole and one skein of #2 weight Patons Kroy Sock Yarn. 

I didn't get on well with the #1 weight yarn, and I will return to it later once I have honed my skills on this loom.  So, I switched to the Patons #2 weight yarn and soon I was cooking with gas.


There are things I love about this loom and things I don't love.  But it's the right extra fine gauge to make socks you can actually wear with shoes, and after making one sock, I am not hiding the loom in the bottom of the closet.  I plan to make some socks for Christmas gifts.

I really liked the plastic construction and pegs.  I don't like the looms with metal pegs - all that clacking noise gets to me and it seems harder to catch the yarn and manipulate it. Besides, my Boye sock loom with metal pegs has several loose pegs and one bent peg.  Despite my fears of breaking a plastic peg, I had no problems with pegs bending or breaking, even after dropping the loom on the floor three times (not on purpose).


The yarn slides so smoothly over these pegs that it's a joy to work with.  The loom is lightweight and small enough to be held in one hand while you work, making it a great companion for watching TV or for traveling with.  Just pop it into your bag and take it along.  I think that I will have to be careful not to break a peg, because they are not replaceable.

Overall, I really enjoyed working with the KB Sock Loom EFG and it will be perfect for making those baby socks that I couldn't manage on my larger gauge looms. The loom is not expensive - $14.99 from KB directly plus shipping.  I purchased mine for a few dollars more and free shipping from Amazon so it came out to be a little less in the long run and I got it in two days.

If you want to loom real socks, and not just bulky slipper socks, this is a great loom to learn on and work on.