Saturday, May 21, 2016

Lattice Lace Swirl Hat on Round Loom


It’s been a while since I used a round loom to make a hat, so I wanted to do something a little lacy and special.  I have been working this lattice lace stitch in cotton for other projects, but I wasn’t sure how to make it work in the round.  I am rather pleased with the results.  I call this my lattice lace swirl hat.
Lattice Lace Swirl Hat

Using my 34-peg round loom and my treasured assistant, Miranda the model head, I devised a pattern that uses only basic K2tog, purl and knit stitches to create the hat.  Because this is a large gauge round loom, you need bulky yarn or two strands of worsted weight yarn. I used two strands of Red Heart Super Saver Yarn in Buff.

Because I wanted the  swirl effect, there is a little hitch to row 3, but once you learn to do it, it’s very easy.  The key is to keep track of which row you are on, or your lattice could end up going the wrong way!

How to make the Lattice Lace Swirl Hat:


Cast on 34 pegs, we are knitting in the round.

Ribbing - K1, P1 for 4 rows


Pattern:
Row 1 - *yo, K2tog, repeat from * all the way around the loom, ending with K2tog
Row 2 - knit all 34 pegs
Row 3 - *k2tog, yo, repeat from * all the way around the loom, ending with yo (see more below)
Row 4 - knit all 34 pegs

Row 3 Instructions: In order to keep the swirl, the k2tog has to be done by moving the loop from peg 34 to peg 1.  Peg 34 will be the ending yarn over for that row.   Any stitch that was a yo the last time, will not ever be moved.  I like to think of the pattern like a tree, with one thick trunk-like swirl and lots of little branches. It is always the loop that is at the top of the trunk that gets moved over in the k2tog.  This way the lace is always moving right, and seems to swirl into the crown)
I moved all the loops for the K2togs, then e-wrapped the pegs with loops, and yarn over in front of the empty pegs, then knit off the pegs with loops.  My way of doing the rows quickly.

Row 3 moving loop from peg 34 to peg 1


Repeat pattern for desired length.  I use Miranda to help me figure that out, as she models the hat as I go.  My pattern length ended up being 4 inches. 


Crown
Knit 4 rows
Decrease by k2tog, with no yarn over.  Move loop from peg 1 to peg 2, move loop from peg 3 to peg 4, etc., all around the loom. You will have 17 pegs with two loops each.  Now wrap and knit only those pegs with loops.  Knit 1 more row on 17 pegs.


Cut yarn leaving a long tail.  Thread tail end through yarn needle and thread yarn through the loop on each peg all around the loom, lifting the loops off the pegs as you go.  Pull yarn tight, to form crown and close up the top of the hat.  Tie off and weave in ends.


Lattice Lace Swirl Hat in Navy

Tuesday, May 17, 2016

Knitting a Sock on the Round Loom

The first thing I learned to make on my round loom was a sock. A pair of socks is still the nicest gift you can make with a large-gauge round loom and even learning how to do the heel and the toe is not too hard and becomes easy with practice.


Like many loomers, I started with a set of large-gauge round looms. I bought a set of the Darice looms from Amazon.  Even though you  need bulky yarn or to use two strands of yarn at once, there are so many different things you can do with them.  For socks, I use the small, 24 peg loom and two strands of worsted weight yarn. These socks will be bulky and thick, so they are not suitable for wearing with shoes.  They would be just the thing with boots or for padding about on cold floors.  They are also really soft and cozy on your feet.

Since we will be making these with a turned up cuff, it doesn't matter how you do your cast on, the first row will be incorporated into the ankle of the sock.

Cast on all 24 pegs, we will knit in the round. This pattern uses the e-wrap method throughout.


Knit 14 rounds.


Now form the cuff by pulling the first row (the bottom row of your knitting) up to the pegs and with your hook, place each stitch from your first row over the corresponding peg, over the loops that are on the pegs, so that there are now two loops on each peg.


 All the pegs will have two loops when you are done turning up the first row.  Now pull the bottom loop over the top loop so there is just one loop on each peg. A nice trick is to tuck the tail of yarn from the first row into the cuff so it is hidden neatly.


Knit 7 rows.


Turning the heel - The heel will be worked on exactly half the peg


Increase
s. First we decrease, then we increase.

Decrease
Knit pegs 1 - 12.
Knit back from peg 12 to peg 2.
Wrap peg 1 without knitting, knit peg 2 - 11.
Wrap peg 12 without knitting, knit pegs 11 to 3.
Wrap peg 2 without knitting, knit pegs 3 to 10.
Wrap peg 11 without knitting, knit pegs 10 to 4.
Wrap peg 3 without knitting, knit pegs 4 to 9.
Wrap peg 10 without knitting, knit pegs 9 to 5.
Wrap peg 4 without knitting, knit pegs 5 to 8.
Wrap peg 9 without knitting, knit pegs 8 to 5.


Pegs 1 - 4  and pegs 9 - 12 will have two loops each.  Pegs 5,6,7,and 8 will have one loop each. 4 double loop pegs, 4 single loop pegs, then 4 double loop pegs.
Wrapped but not knitted pegs on heel decrease


Increase
Your working yarn is now at peg 5,  Wrap peg 4.  Three loops on peg 4.  Knit the bottom two loops over the top loop one at a time - bottom loop first, then the middle loop. Continue wrapping and knitting pegs 5 through 8 normally. Wrap peg 9, three loops on peg 9.  Knit bottom loops over the top loop, one at a time, bottom loop first. Knit back to peg 4.  Now wrap peg 3, three loops on peg 3 and knit the bottom two loops over the top loop one at a time as previously instructed.

Continue to knit back and forth, increasing one peg on each row as above until you have three loops on Peg 1. Knit the bottom two loops over the top, one at a time, bottom loop first.

Right at the corners of the heel, you may see that there are "holes".  You can fix this by pulling the back loop of the stitch on peg 12 over and place it on peg 13, then knit the bottom loop over the top.  Do the same with the back loop of the stitch on peg 1 and place it on peg 24, then knit the bottom loop over the top.

Now, we continue to knit in the round as usual. The heel is done!

Sock Body
Continue to knit in the round until the sock is about 1 1/2 inches shorter than the total length you desire. About 5 inches is average for an adult sock.

Toe
For the toe, simply create it using the same method of decrease and increase as we used for the heel.   So, repeat the heel instructions.  However, when you have completed the toe, do not continue to knit in the round.  Bind off all 24 pegs. 

Finish by seaming the toe flap to the body of the sock. 


Sunday, May 15, 2016

Adorable Adult Booties Pattern for the Loom


I just love how quickly these booties worked up, and how simple they are.  There's no turning heels here, just a basic pattern in the round with some easy-to-do decreases.

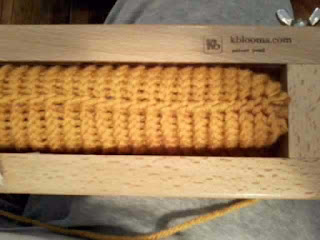
These are made on the KB all-in-one loom.  Each slipper bootie is about 8 inches long, but they stretch to fit my size 10 feet just fine.  They are pretty much one-size-fits-all.

 Using the five peg spacers, adjust the loom so that you have 60 pegs to knit in the round. 

How to knit the Decrease  Rows
Decrease one stitch on either side of the slider 5 peg spacer.  This is going to be done by moving the loop on the pegs that are lined up with the five peg slider piece to the pegs directly to the left on one side and to the right on the other.  In other words, there will be a peg on either side of the loom with two loops, and the pegs next to the slider will now be empty.
As I am knitting counter-clockwise, another way to explain this is that I am moving the loop from peg 25 and placing it on peg 24, then moving the loop from peg 31 to peg 32 on my first round.

Then push the slider pegs down one.  There are now 58 pegs in total. 


Decrease will be done the same way on each row they are called for, but I won't give the peg numbers.  They will always be done at the corner pegs, leaving the corner pegs empty and allowing you to adjust the slider so the total number of pegs decreases by two.

Pattern:


With your main color (A), cast on 60 pegs.  Leave a long tail for seaming the bottom.

With A, knit 8 rows.
Purl 1 row.

With contrast color (B), purl two rows.

Change color to A, knit one row.


*With A knit a decrease row.
Knit 1 row.

Repeat from * 7 times. 

With A knit a decrease row.

Change to contrast color B.

Knit 1 row.

*Knit a decrease row,  Knit one row.

Repeat from * 4 times.

Change yarn to main color A.

K1 P1 ribbing for three rows.

Bind off.

Seam the bottom.

I like to sew up the bottom seam while the bootie is still on the loom. 


Thursday, May 12, 2016

Easy Loomed Slippers Pattern


One of my favorite things to do is to make socks and slippers.  I love soft, cozy things that wrap my feet in warmth.  I make a lot of socks, and I usually use one of my looms.  This pattern is for one of the simplest pair of slip-on booties you will ever make.  They don't require making heels and you can knit in the round, with just one seam to make.  Even better, the pattern can be adjusted for any loom, even though I used my all-in-one loom from KB for this pattern.

This pattern will make a slipper bootie that will fit most teen or adult feet.  For a man's slipper, you would probably need to make it bigger.

I know, it looks more like a pocket than a slipper, but that's why I put the photo of how they fit first.  As you can see, there's lots of stretch in these little, easy to loom gems.

On the 28" All-in-one loom, I started by using the five-peg sliding pieces and adjusting the sliders so that I would be knitting in the round over 60 pegs.

To form the toe and decrease for the cuff, I decreased by knitting two together on the last two pegs before the slider, then sliding it down one peg to keep me knitting in the round on 48 pegs.

Decreasing on the corner pegs

Push the five peg slider down one peg
CAST ON 60 pegs.

Place a marker at the peg that is 7 pegs from the end of the row facing you.  I like to knit left to right since it is easier to move the right slider and still have one slider side close to the edge.

Knit 12 rounds of the full 60 pegs.

At this point, I find it easiest to seam up the bottom of the slipper, because it's being held even and secure on the loom.  You don't have to do this seam now, you can wait until you're done.  But there's something very satisfactory about taking a finished bootie off the loom and having nothing left to do. So, I just push the bottom up through the loom and sew up the bottom seam from the wrong side, then push it back down and continue knitting.


Decrease

I begin by moving the loop on the corner pegs of the long sides.  Move the corner loop to the loop before it on one side, then turn the loom and move the corresponding loop on the opposite corner to the peg next to it on the side in the same manner.  (see the photos above) In this way, the two pegs that are next to the pegs on the slider are empty.  Move the slider down to the pegs that now have two loops on them.

Knit the row with the k2togs.  Then knit another row.

Decrease again in the same manner.  Knit another row.

Keep repeating the pattern of decrease one row, knit another row until the slider has been moved down even with the peg that placed the marker on. After you have decreased that final row and knitted another row, you can start the cuff.

Cuff

5 rows of K1 P1 ribbing in the round.    

Bind off, and you're done!