If you own a Prym sock loom, you probably consider it to be one of the most enjoyable looms you've ever used. It's light, compact, and its sturdy frame sits neatly in your hand while you knit.
But one thing that you cannot do is purl. Because the pegs are shaped like slightly bent paper clips, stitches slip off if you try to purl. Purling on the loom involves pulling the loop of the peg and replacing it. Generally, the loops on neighboring pegs will slip off too. The manual, videos, and patterns provided by Prym show various methods of making the cuff but none involve a purl stitch. They know it's impossible.
Or is it?
Here is a sock with a ribbed cuff that I made on the Prym large loom (36 pegs).

Or, as I like to call it : Prym Rib (I know that's a terrible joke).
The way to create the ribbing begins with rows of regular stockinette. Cast on your foundation row. Start by wrapping each peg. When you are knitting this row, use the flat stitch, that is, lay the yarn flat in front of the peg. This keeps the edge of the ribbing tighter. Now you can e-wrap and knit the next 11 rows.
Now we begin making our ribbing. I recommend using a couple of elastic brands over the stitches you aren't working on. This keeps any stitches from skipping but it also helps to isolate the stitches you are purling.
For this sock I used a k2 p2 ribbing. But with the 36 peg loom, you could use k1 p1 rib out or even a k2 p1.
Cover all stitches except the first p2 with an elastic. I use one on each side of the loom. Pull one of the loops off the peg with the loom tool, then pull out the stitch on each row right down to the foundation row. It will look like a ladder.


Now we will re-stitch all those rows with a crochet hook. Starting above the first “rung” on your ladder, insert the crochet hook from the top and turn it so that the yarn loops around it and the hook part is now facing up.
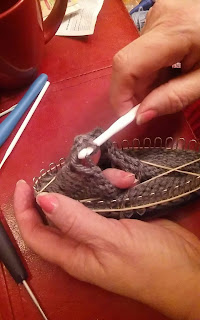

Now, simply pull the second “rung” through that loop. Then the third, hook it and pull it through the loop, always working from the back of your knitting - that is, inside the loom. Continue until you have pulled all the rungs of your ladder through with the hook. From the back, it will look like knitted stitches, but from the front of your work, it will be purled.


Repeat for the second purl stitch. Then, move your elastic over. Cover the p2 you just did, plus the next two stitches which are to remain K2. Leave only the next set of p2 uncovered. Repeat the process with the unraveling and the purling with the crochet hook. Repeat your k2 p2 pattern all around until you reach your first k2.
And there! Your ribbed cuff is done! If you want it to be a thick cuff, then simply knit more rounds initially and turn it up, as you normally would a rolled cuff on the Prym or other round loom. Make your cuff as short or long as you like.
Holiday Boot Sock/Slipper Sock